
Looking for the Office 2016 version? Try Accessible Word documents in Office 2016
Accessibility Checker
Microsoft Office (Word, Excel, Power Point) provides a built-in accessibility validator. The checker does not identify all issues, but looks for things such as: missing alternative text, duplicate slide titles, and potential reading order issues.
How to use the Accessibility Checker:
- Activate the File Tab > Info > Check for Issues > Check Accessibility
- Activate the results in the Accessibility Checker pane
- Address the listed issues. Helpful information to understand and fix the different issues is provided at the bottom of the pane
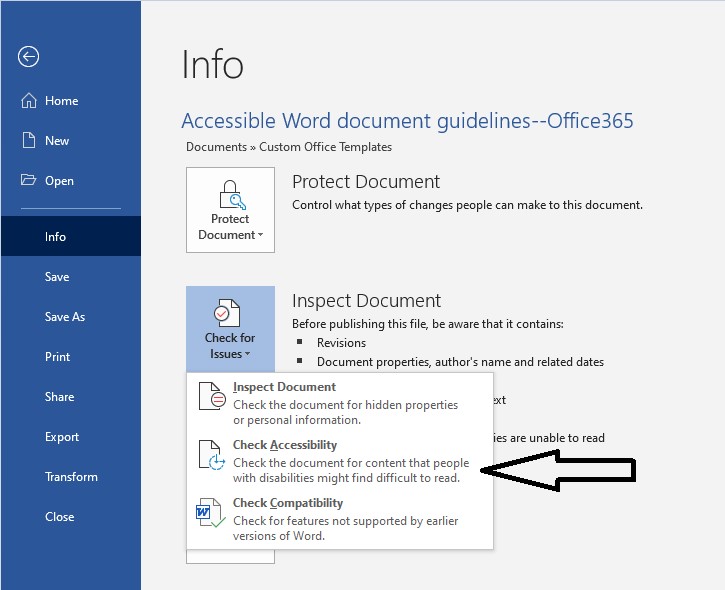
The Accessibility Checker is also located on the Ribbon under the Review tab > Check Accessibility. Activate the “Keep accessibility checker running while I work” check box in the checker pane to keep track of accessibility issues in real time.
Templates
Master templates are used to define the layout and content of a document/presentation. This can be used to create an accessible document template that does not require significant adaptation.
What to look for when creating an accessible template:
- Colour contrast and use of colour
- Header and footer text
- Font size, font face, and spacing of content
- Consistent styles for headings, lists, etc.
How to create a template:
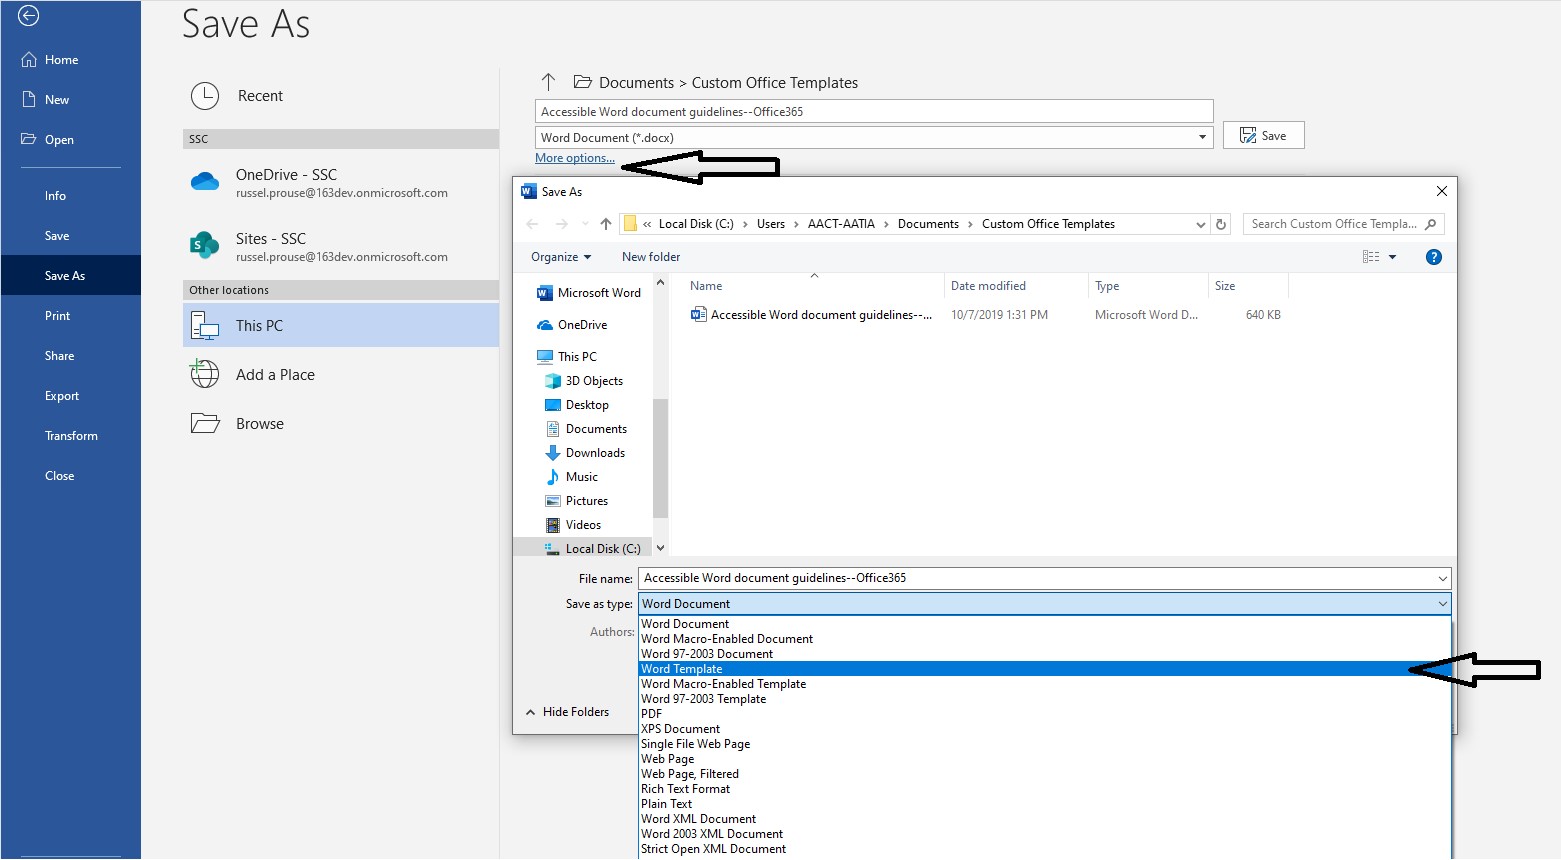
- Activate the File tab in the ribbon > Save As
- Activate More options and choose a folder to save your template
- Type a name for your template in the File name field
- Activate the Word Template option in the Save as type list
How to open a template:
- Activate the File tab in the ribbon > Open
- Press the Browse icon
- Open the file folder “Custom Office Templates” under My Documents
- Select the template you created and activate Open
- Make the changes you want, then save and close the template
Page layout
Navigating and locating content can be a major challenge for users who have vision loss or learning / cognitive disabilities. To create an accessible document, use built-in styles.
Headings
Headings allow users to navigate and locate content. To ensure the document structure improves accessibility and readability, use built-in headings and styles. Using proper heading order makes it easier for screen readers to read a document correctly.
Ensure headings are denoted through structure and not only denoted implicitly (by using different fonts, font sizes, bolding, italics, etc.). Created styles will not be treated structurally as headings.

To style headings:
- Find the Home tab
- Select the desired heading level from the Styles section of the ribbon
- To see more heading levels, expand the Styles section of the ribbon
To check headings:
- Select the text that appears to be a heading
- Open the Home tab and ensure the Styles toolbar on the ribbon is visible
- Place the cursor on each heading, and verify that it is linked to the appropriate heading style in the Styles toolbar
Headers and Footers
Ensure headers and footers are properly formatted. When headers and footers are typed in as text on each page, users of adaptive technology often mistake them as part of the page content. Therefore, do not create headers and footers that can be accessed in the editable area of the document.
To use headers and footers in Word:
- Select the Insert tab from the ribbon
- From the Headers and Footers section of the ribbon, select either “Header” or “Footer”
- Choose your preferred style
- After creating the Header or Footer, press the “Esc” key to return to the main body of the document

Columns
To ensure that multi-column content will be read in the proper order by screen readers, use the built-in columns feature to create structural columns.
To insert columns:
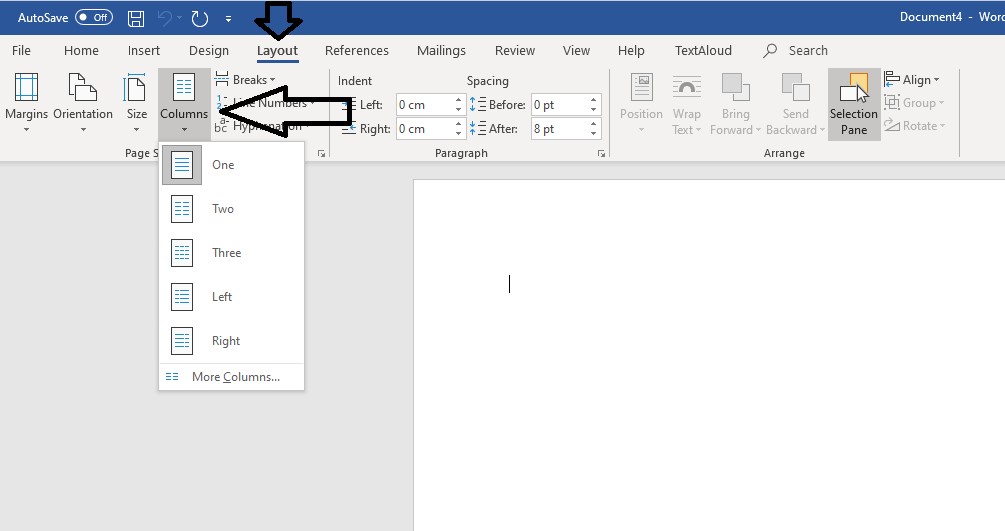
- Select the Page Layout tab from the ribbon
- Choose “Columns” menu button under the “Page Setup” tools
- Select the desired number of columns from the grid
- As you type, the current column will fill and spill into the next
Lists
Lists are used to group and organize related items. Ensure lists and sub-lists are structured properly. Do not create lists manually using tabs, dashes, or asterisks.
Word provides features to create ordered (numbered) or unordered (bulleted) lists. Using the built-in list formatting allows users of screen readers to rapidly browse and access list content, and to understand the relationship between list items.
To create a list:
- Open the Home tab in the ribbon
- Under the Paragraph toolbar, you will find list options such as bullets, numbering, sorting, etc.
Fonts
Choose fonts and styles that are easy to read.
- Use “sans serif” fonts with sufficient spacing between letters Ex. Arial, Verdana, Century Gothic
- Use fonts 11-14 points in size for body text
- Fonts that are too small or too large may not be readable by some users
Non-text Elements
Alternative text
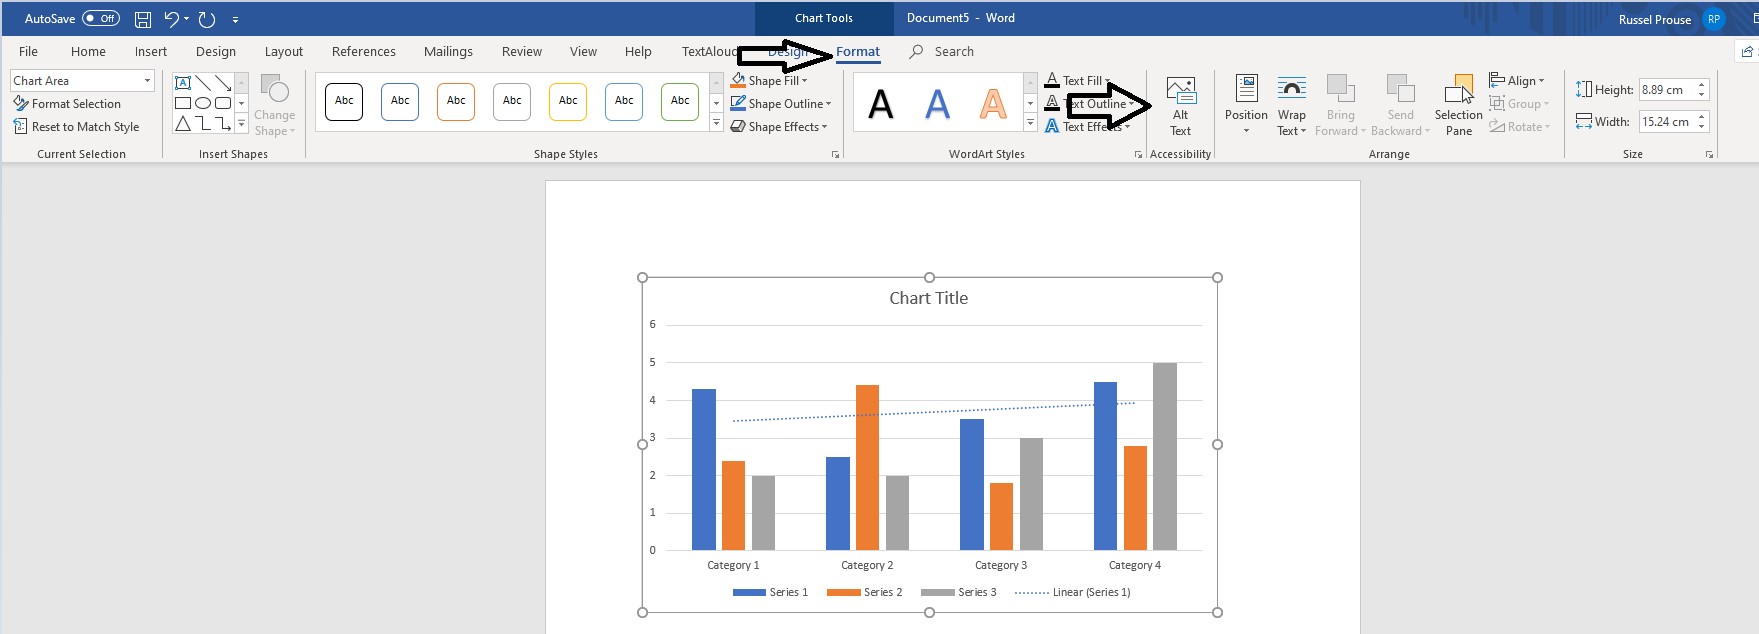
Visual elements such as photos, screenshots, icons, videos and 3D models should all include alternative text. Alt text helps people who cannot see the image, understand the message and what is important. Good alt text should be concise and to the point. It should not be more than a sentence or two and should include the important information the image conveys. When creating an alt text, do not begin with “this is an image of”, but do begin with “Screenshot of” for screenshots.
To assign alternative text to images:
- Select the image
- Open the Format tab in the ribbon
- Activate the Alt Text tool
- If an image conveys no information (i.e., it is decorative or redundant), check “Mark as decorative”
- If the image is meaningful, convey in words the meaning, function, or purpose communicated by the image
- Activate the Close button
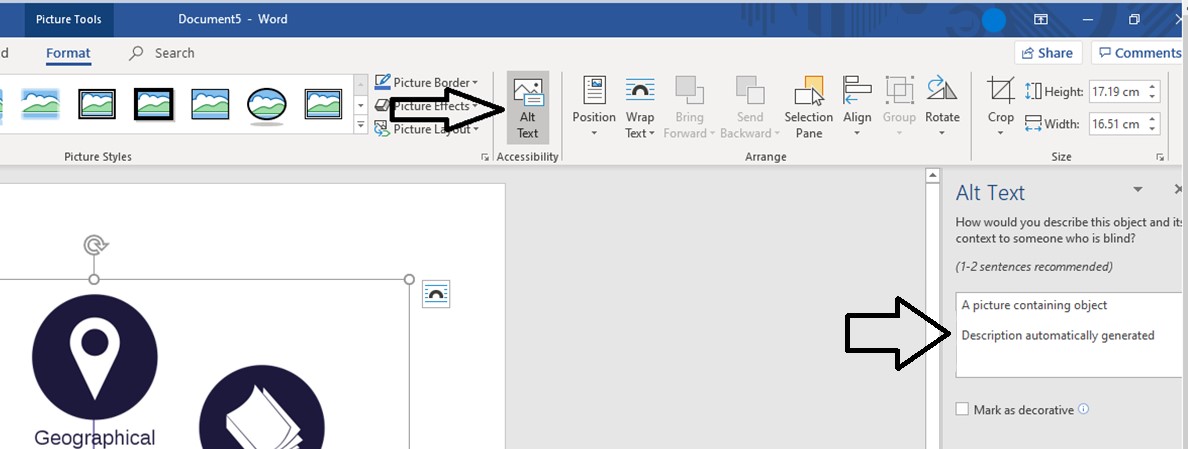
Be sure to check and update any automatically generated alternative text for images.
Charts and Diagrams
Ensure complex images and charts provide long descriptions. Complex images include: schematics, plans, diagrams, or any other image that conveys a large amount of information. This is necessary, as users who cannot see the complex image will not be able to sufficiently determine its value/purpose.
To add a long description to diagrams and chart, first add concise alt text (e.g. the chart title) as describe above. Then, include a longer text alternative below the chart.
Links
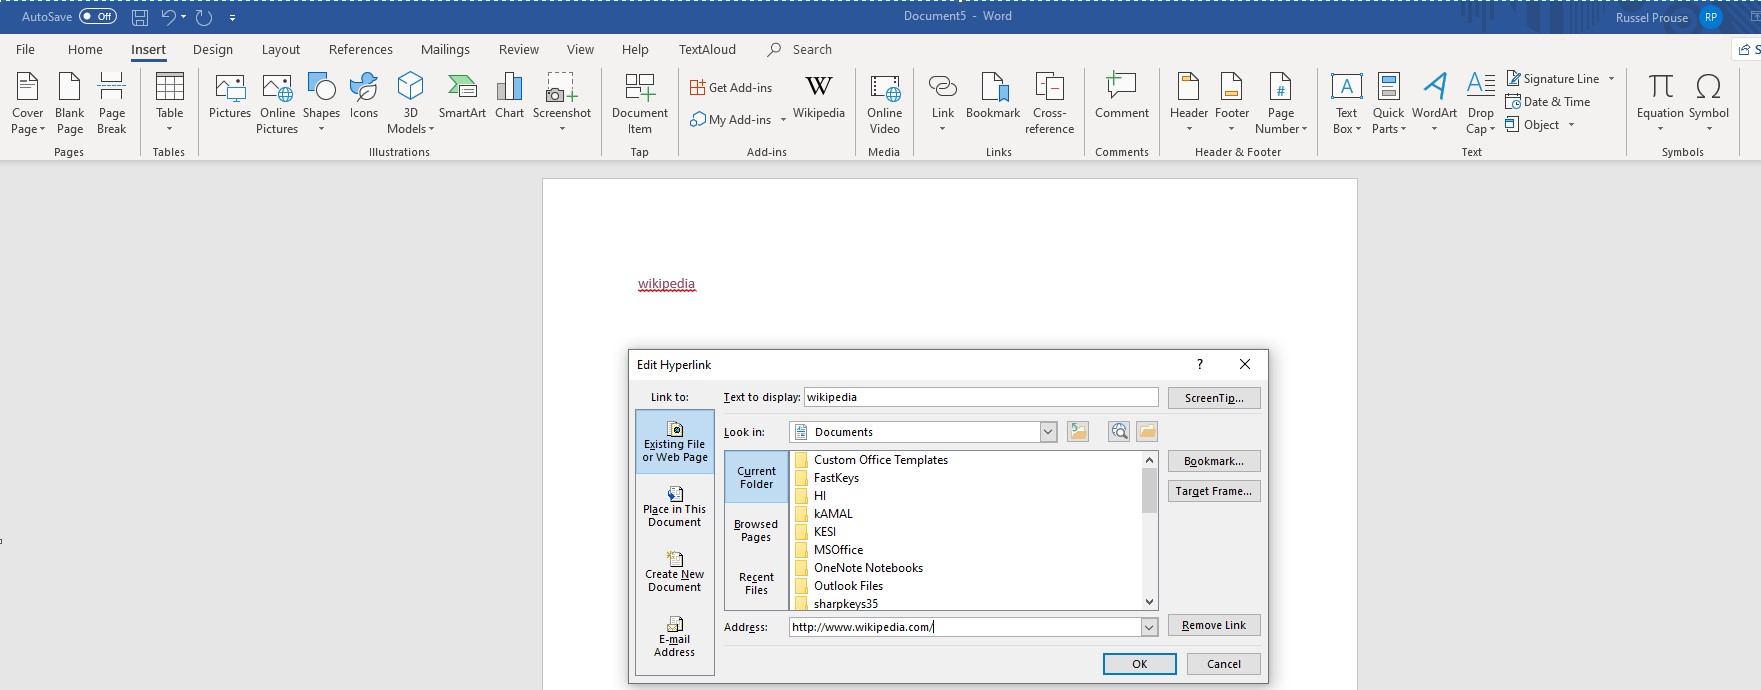
People who use screen readers sometimes scan a list of links; therefore, ensure link text is meaningful within the context of the document. Link text should accurately reflect the target and purpose of the link. If link text is not provided, users will need to follow the link to determine its purpose, which can present difficulties for users of adaptive technology. An example of appropriate link text would be including the full title of the destination rather than linking to the text “Click Here”.
To add hyperlinks with meaningful text:
- Type or paste a web address in your document and press spacebar or “Enter” to convert into a hyperlink
- Select the link and open the context menu
- Activate Edit Hyperlink
- Edit the Text to Display field with meaningful text.
Additional Resources
- Microsoft: Make your Word documents accessible to people with disabilities
- WebAIM: Microsoft Word, creating accessible documents
Looking for the Office 2016 version? Try Accessible Word documents in Office 2016
Page details
- Date modified: